

-
-$30.00 USD

 Proveedor:NO-NAME brand
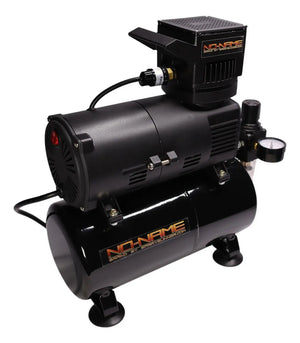
Compresor de aerógrafo Cool Tooty con tanque de marca NO-NAME
Precio habitual $130.00 USDPrecio habitual$160.00 USD-$30.00 USD Precio de oferta $130.00 USD -
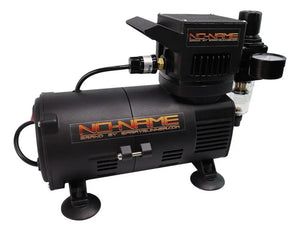
 Proveedor:NO-NAME brand
Compresor de aerógrafo Cool Tooty con adaptador de 1/4" de NO-NAME Brand
Precio habitual A partir de $135.00 USDPrecio habitual -
-$10.00 USD
 Proveedor:NO-NAME brand
Compresor de aerógrafo Cool Rooty Tooty de la marca NO-NAME
Precio habitual $85.00 USDPrecio habitual$95.00 USD-$10.00 USD Precio de oferta $85.00 USD


Elevate Your Sneaker Customization with the Right Airbrush Equipment for shoe painting.
Customizing sneakers with airbrush techniques allows artists and hobbyists to create unique, personalized footwear that stands out. To achieve professional-quality results, it's essential to use the right airbrush equipment for shoe painting. This guide will walk you through the essential tools and supplies needed for painting shoes and creating custom sneaker designs.
1. Airbrushes for shoe painting:
- Gravity Feed Airbrush: A gravity feed airbrush is preferred for shoe painting due to its precision and control. The paint cup is positioned on top of the airbrush, allowing gravity to draw the paint into the airbrush for smoother flow and fine detail work. Popular models include the Iwata Eclipse HP-CS and the Harder & Steenbeck Evolution.
- Dual-Action Airbrush: Dual-action airbrushes offer better control by allowing you to adjust both the air and paint flow simultaneously. This feature is crucial for detailed and intricate designs, making dual-action airbrushes a must-have for custom sneaker projects.
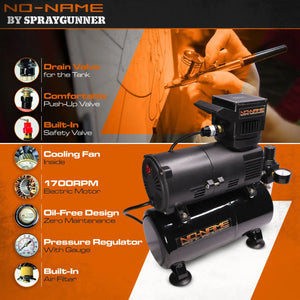
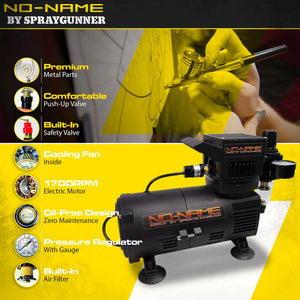
2. Air Compressors for shoe painting:
- Reliable Compressor: A consistent and reliable air compressor is vital for ensuring even paint application. Look for compressors with adjustable pressure settings, such as the Iwata Smart Jet Pro, to accommodate different paint types and techniques. Portable and quiet compressors are also beneficial for home or studio use.
- Moisture Trap: An air compressor with a built-in moisture trap prevents water from mixing with the paint, ensuring a smooth and clean application.
3. Paints and Reducers
- Acrylic Leather Paints: High-quality acrylic paints specifically formulated for leather and fabric are essential for customizing sneakers. Brands like Createx and LK Shoes offer a wide range of vibrant colors that are flexible and durable, ensuring the paint won’t crack or peel.
- Paint Reducers: Thinning your paints with the right reducer is crucial for achieving the correct consistency for airbrushing. Createx 4011 Reducer is excellent options that help maintain smooth paint flow and prevent clogging.
4. Preparation Supplies
- Cleaners and Degreasers: Properly preparing the shoes is critical for paint adhesion. Use a cleaner like Createx 4020 to remove oils, waxes, and finishes from the shoe surface before painting.
- Sandpaper: Lightly sanding the surface with fine-grit sandpaper (around 400-600 grit) can enhance paint adhesion, especially on glossy or finished surfaces.
- Masking Tape and Stencils: Use high-quality masking tape to protect areas of the shoe you don’t want to paint. Stencils allow for precise and intricate designs, making it easier to create detailed patterns and graphics.
5. Finishing Supplies
- Sealants: Applying a protective sealant ensures the longevity of your custom design. Createx UVLS clear 4050 and LK Shoes clear coat are popular choices that provide a durable, water-resistant finish.
6. Additional Tools and Accessories
- Airbrush Cleaning Kit: Maintaining your airbrush is essential for consistent performance. A cleaning kit includes brushes, needles, and cleaning solutions to keep your airbrush in top condition.
- Palette and Mixing Cups: For mixing and thinning paints, use a palette and small mixing cups. This allows for precise control over paint colors and consistency.
- Protective Gear: Always prioritize safety by wearing a mask or respirator to protect yourself from inhaling fumes and particles. Gloves help keep your hands clean and free from paint.
Step-by-Step Guide to Painting Custom Sneakers
- Prepare the Shoes: Clean the shoes thoroughly with a cleaner/degreaser to remove any oils and waxes. Lightly sand the surface if necessary to enhance paint adhesion.
- Plan Your Design: Sketch your design and decide on the color scheme. Use masking tape and stencils to outline your design on the shoes.
- Mix the Paint: Thin your acrylic paints with the appropriate reducer to achieve the desired consistency. Test the paint flow on a piece of scrap material.
- Apply the Base Coat: Using your airbrush, apply a thin, even base coat. Allow it to dry completely before applying additional layers.
- Add Details: Layer different colors and use stencils to add intricate details. Build up the design gradually for the best results.
- Seal the Design: Once the paint is fully dry, apply a protective sealant to ensure the design is durable and water-resistant.
- Cure the Paint: Give water-based paint enough time to cure completely before moving to the next step of using your freshly painted custom shoes.
Conclusion
Airbrushing custom sneakers is a rewarding and creative process that allows you to express your unique style. By investing in the right shoe painting airbrush equipment and following proper techniques, you can achieve stunning, professional-quality results. Whether you’re painting leather sneakers, canvas shoes, or fabric footwear, these essential supplies will help you create one-of-a-kind designs that last.